INTRODUCTION
Beginning
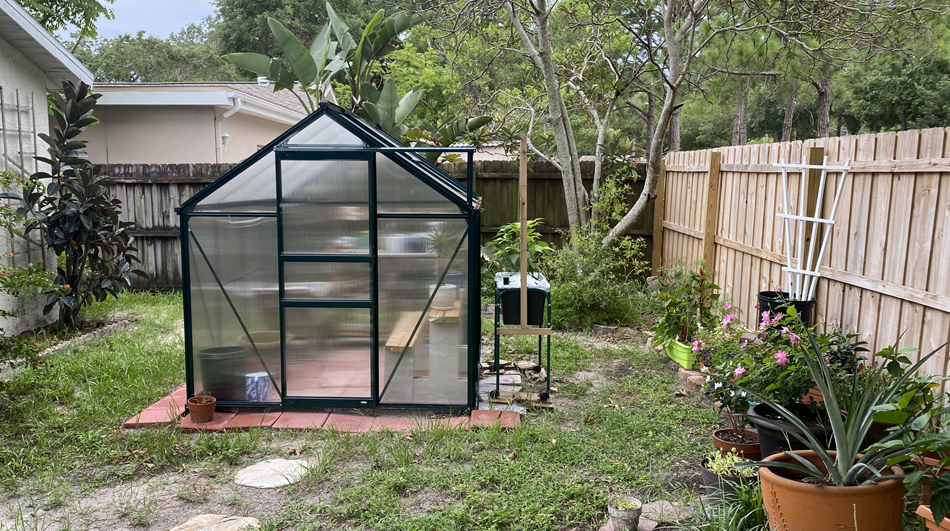
My wife began gardening, indoor plant care and maintenance, after a very difficult moment for her and the family. The therapy of looking after a living thing is a special bond, so much so that we thought that having a greenhouse would be a good idea to expand both of our desires. After one season of effort, we knew we were wrong. The west coast of Florida is no place for that kind of environmental control. It turned into a storage place for pots and the like. Hurricane Iain was the final call. Several panels were blown away and we both decided to say goodbye to the greenhouse.
Technology StartHelping my wife with her indoor plants became more than heavy lifting when I researched the technology available from Arduino and Raspberry Pi. She wanted the ability to manage several plants at once and the tinkerer in me took over. I began with the Arduino Plant Watering Kit and its associated hardware. I wanted to learn more about this through experimentation and minimal expense in the beginning. The technology available from Arduino gave me the chance to understand and learn how it works. The basic functions of reading a sensor or activating a solenoid was a good foundational start. The coding aspect was just a matter of understanding the logic at its base. Having coded html, css, php and the like, it didn’t take me long to understand how the microcontroller works. I took a couple of plants from the patio, monitored them to get a better understanding of how they thrive. I switched to growing from seed with both lavender and parsley, being very successful indoors and under a grow light.
|
 \ \ |
The farmer is the only man in our economy who buys everything at retail,
sells everything at wholesale,
and pays the freight both ways.
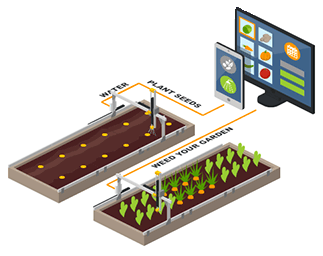
FARMBOT - RAISED BED
Site Preperation
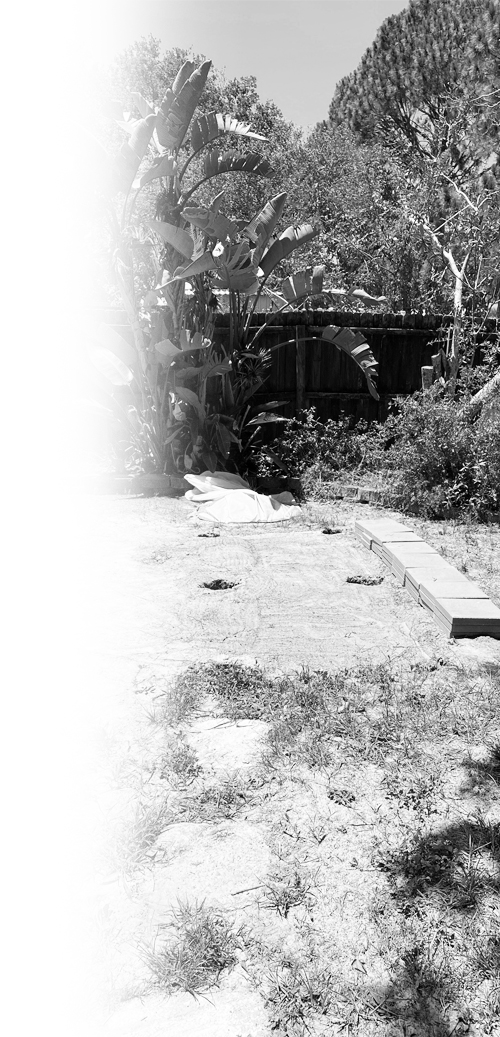
The demolition of the greenhouse was a lot easier than building it. We were both sad to see it go as we both had put so much effort into assembling it. After stacking all the pavers, we used for the floor off to the side, I began leveling the site and digging the holes for the post. Working in the Florida sun and on weekends wasn’t as bad as I thought as I was careful not to overexert myself and hydrate properly. All in all, it took me one weekend to prep and level the site for the FarmBot.
The next to-do item was to get power and water to the site. Since my water access to the back yard was on the other side of the house, I ran water and power from the side closest to the site which meant running a heavy-duty garden hose and extension cord. These were run down the side of the house to the site along with an ethernet cable to make the FarmBot directly wired to the internet. More on the ethernet connection later in this discussion. To not have the hose, power and ethernet cabling exposed, I ran them through 2-inch PVC and buried it from the house to the raised bed.
Raised Bed
Assembly
The instructions, on the FarmBot website, for the raised bed were excellent. All the specifications were clearly listed and explained. As the measurements were metric, I even went and purchased a metric/imperial tape measure to make sure I had all the right tools for this project. As the famous quote goes “Measure twice, cut once!”. I was able to get a decent deal on the lumber and made doubly sure that the 3-meter (10 ft.) boards were straight after reading the comments in the forum about making sure that the x axis was straight and parallel. I also didn’t purchase pressure-treated lumber as I’ve heard stories of arsenic leeching into the raised bed and causing problems. Once all the boards were cut, I used an exterior stain to protect the main boards and a tar paper wrap for the posts for protection below the ground line.
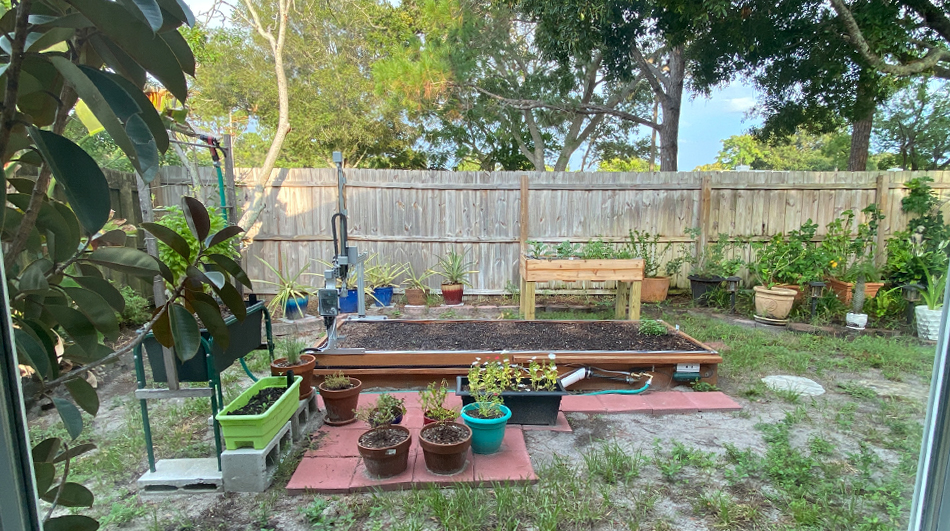
The assembly of the raised bed was straight forward after the site was leveled and the holes were dug for the posts. Being extra mindful of the need for the x axis to be parallel, I made sure that this measurement was the same at all three points of the bed. My initial soil purchase was about $200 and filled the bed to about ¾ high. Another $100 in soil and fertilizer and the bed was complete. I paid extra attention to the x axis, sanded them smooth and applied another coat of stain to make sure that when the gantry moved along this run, it would not have any obstructions. Now all I needed was the FarmBot Express v1.1 which was being delivered the following week.
FarmBot Build & Installation
I went through all the documentation and videos available so that I would be well educated for this installation. The FarmBot arrived as expected and I spent an entire Saturday building and installing the equipment. It went together as promised, but unforeseen by me or the factory was a malfunctioning Farmduino board. The customer support staff were fantastic, and another board was shipped out to me immediately. Upon installation of the new board, I was up and running. The setup process was a little challenging as the z axis gave me fits. I will say that the FarmBot Forum is a great resource for the information necessary to solve this and other problems. Up next was calibrating for this raised bed.
Calibration
I found out the hard way that you cannot daisy chain the ethernet connection to the FarmBot as was mentioned in the online documentation. If I had known that in the beginning, I would not have run an ethernet cable, but used the wi-fi connection at the start. My wi-fi signal was very weak so I had to purchase a Wi-Fi extender to increase signal strength at the bot. I was finally able to complete the setup and calibration. I still had some issues with stall detection along the x axis, so I installed aluminum bar material (1/16” thick by 1 ½ inch wide) along the entire run of the x axis which really helped make the run much more stable. The web app was next, and I will say what an amazing tool it is.
The information that is available and that it is open source makes it so engaging that I couldn’t wait to plant my Fall Garden. I still have a couple of issues with the system that I will discuss later but overall, the Farmbot is up and running.


BLOG
8/5/23
From my home office I can look out at the garden and see the FarmBot in action. I didn’t have the seeding tool calibrated, so I designed the garden in the web app and planted using the coordinates from the app to water the locations as a guide to where I was going to plant the seeds for this season. As I get more familiar with this system, ie scheduling, water curves, etc., the better this will be. I’m two weeks into this season and I already have sprouts of Romaine Lettuce, Beets and Broccoli. I should have started all these plants indoors and transplanted them, but I wanted to see if with a regular watering cycle, they would sprout and they did. I will post about the progress throughout the fall and winter as the growing season is longer here in Central Florida.
 \ \ |
8/12/23
|
8/19/23One of the things that I noticed is that the electronic box gets very hot with the sun directly on it. This is causing a boot cycle to occur many times every day which also causes an error in the z axis. I’m in the process of designing a sunshade that I can 3D print and attach to the gantry to protect the electronic box from the sun. More to follow as the design gets more refined. |
8/26/23
|
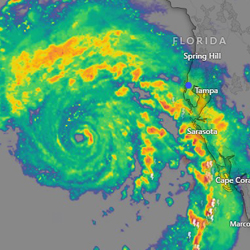
8/29/23HURRICANE IDALIA
|
9/9/23AFTERMATH HURRICANE IDALIA
|
9/10/23FOOTBALL IS BACK!
|